Enabling payments
NAVIGATION Left navigation menu > Settings ![]() > Payments
> Payments
SECURITY Standard, Sales, and Purchasing roles cannot have the settings check box selected - only admin users can access settings.
In Kaseya Quote Manager, you can accept instant credit card payments, payments on account, or prepaid (manual) payments from your organizations. This article explains how to configure each of those three options.
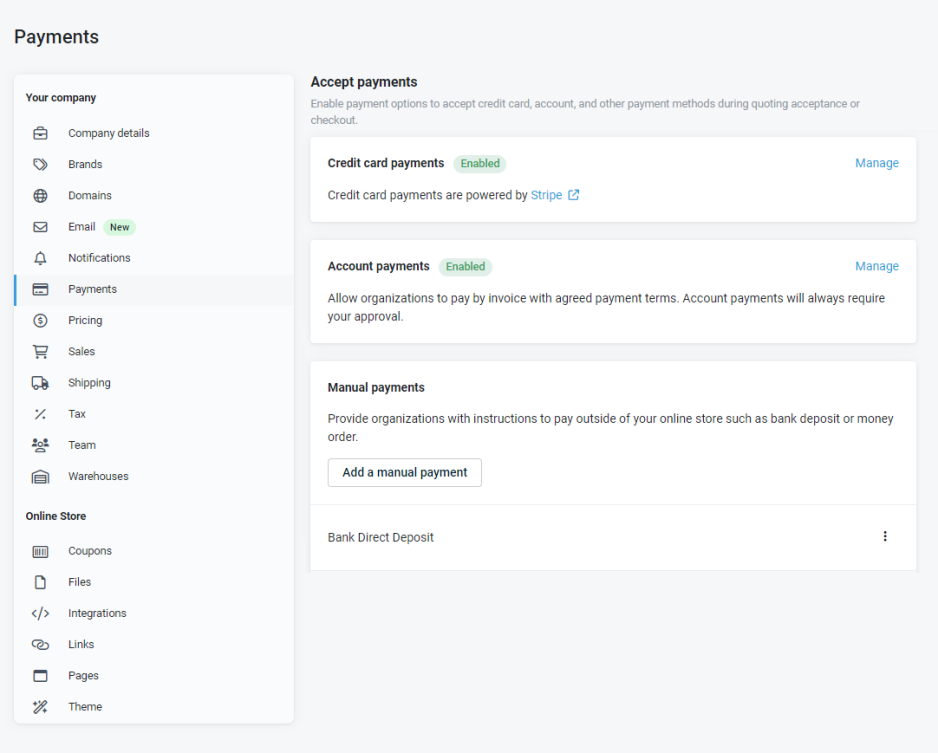
Credit card payments are powered by Stripe. Stripe only charges a transaction fee at the time of use. You are not charged an account or setup fee.
If you do not connect to Stripe to enable credit card payments, you must enable prepaid sales or enable organizations to purchase on their accounts. Otherwise, organizations will not have an option to arrange payment at checkout.
How to...
Credit card sales
To create a new Stripe account or integrate your existing Stripe account with Kaseya Quote Manager, complete the following steps:
- From the left navigation menu, click Settings
 > Payments > Activate stripe payments.
 - Follow the prompts to either create a new Stripe account or log in to your existing Stripe account.
- Upon completion, you will be asked to authorize Kaseya Quote Manager to connect to your Stripe account.

IMPORTANT The processing time for new Stripe accounts is usually within two weeks. You can still accept payments while your account is being processed. However, funds will not deposit into your designated bank account until your Stripe account is approved.
A credit card surcharge is an additional fee charged to your organizations upon credit card payment.
Once you have successfully connected Stripe to Kaseya Quote Manager, complete the following steps to set up surcharging:
- From the left navigation menu, click Settings
 > Payments.
 - In the Credit card payments section, click Manage.
- Enter a surcharge percentage of the total transaction value.
- Click Save.
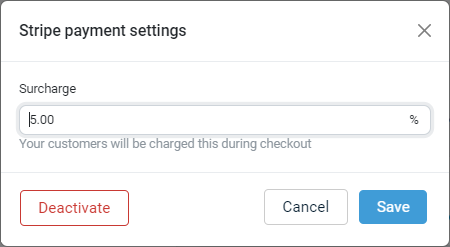
NOTE If trading in Australia, your credit card surcharge cannot exceed the merchant fee (we recommend 1.75%). Refer to this article for details. Stripe's merchant fees are negotiable with volume. Learn more.
NOTE If you are concerned about not recovering the merchant fee when it comes to international cards, consider disabling international cards in Stripe. Refer to this article for instructions.
Stripe makes lump-sum payments, minus merchant fees, to your bank account.
Naturally, this makes the reconciling multiple transactions grouped into one deposit challenging.
To simplify the reconciliation process, install the Stripe payment service in Xero to automate transaction reconciliation, including the Stripe transaction fee.
Kaseya Quote Manager transaction IDs from Stripe are unpacked by the Stripe payment service for easy reconciliation in Xero.
Merchant fees will reconcile to the appropriate account in Xero.
Complete the following steps in your Xero account settings:
- Add Stripe as a payment service by selecting Settings > Payment service.
- Add a payment service, as shown in the following image.
- Click Save.
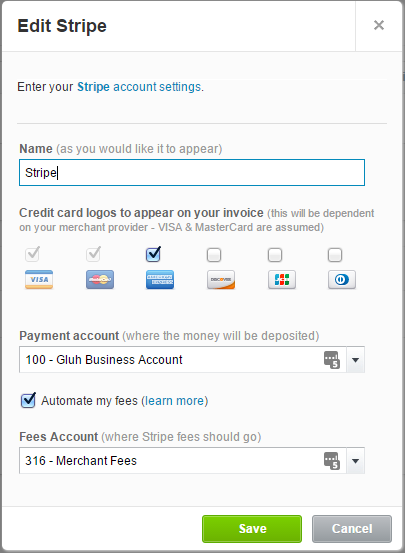
If you have set up Stripe as a payment service and chosen to automate your fees, follow these instructions to reconcile Stripe payments.
You will need to match the statement line with both the payment transaction and the fee transaction created in Xero.
- On the bank reconciliation screen in Xero, next to the bank statement line you want to reconcile, click Find & Match.
- Select the Show Spent Items check box.
- Select the check boxes next to the payment transaction and the fee transaction that you want to match with the bank statement line.
- Click Reconcile.


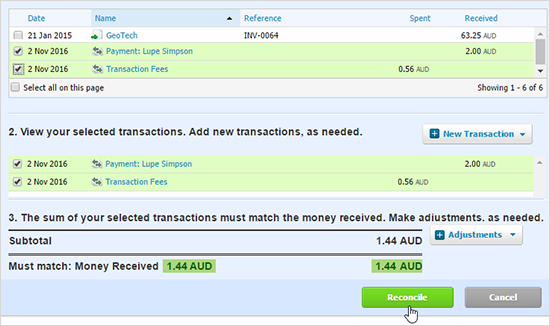
To automate the reconciliation of credit card payments, sign up for Synder.
Synder pulls data from Stripe and automatically matches payments to invoices in Xero. Reconciling them is as easy as clicking one button. Transactions are processed in Synder and queued for import into Xero.
Transactions upload into Xero every few hours (typically 12 hours after Stripe processes the transaction).
Account sales
With this option, organizations must have a Kaseya Quote Manager account to purchase from your Online Store. From the left navigation menu, click Organizations ![]() . Enable any organization to pay on their account by turning on the Can pay on account toggle on their organization detail page.
. Enable any organization to pay on their account by turning on the Can pay on account toggle on their organization detail page.
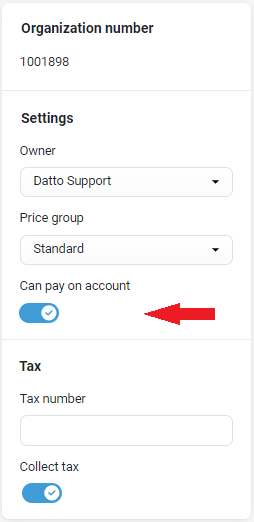
Complete the following steps to enable approved organizations to purchase on account:
- From the left navigation menu, click Settings
 > Payments > Activate account payments. If you have already enabled account payments, click Settings
  > Payments and then click Manage under Account payments.
 - In the Account payment settings dialog that opens, in the Defaults section:
Select the check box next the following option to activate the pay on account feature for all new organizations - otherwise deselect it: New organizations can pay on account
Select Yes to the following question to activate pay on account for all existing organizations - otherwise select No:
Do you want to apply this change to all existing organizations?Enter your business bank account details and payment terms.
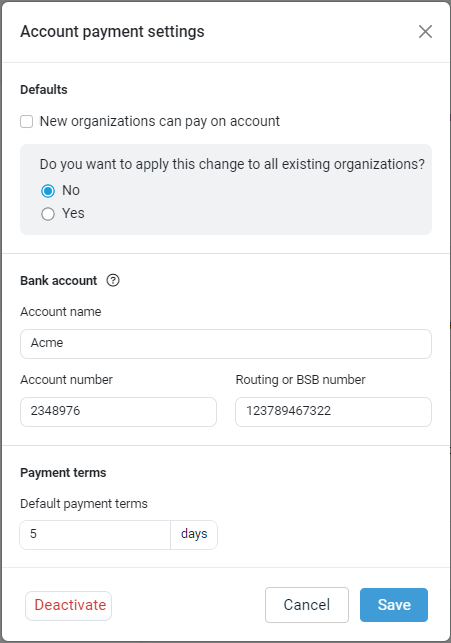
- Click Save.
NOTE Account-paid sales orders require your approval. Refer to Approving sales orders.
NOTE Account details appear on invoices for organizations that can pay on account. The default credit status syncs via your Autotask or ConnectWise PSA integration.
Prepaid (manual) sales
To enable customers to pay outside of your Online Store, such as bank deposit or money order, complete the following steps:
- From the left navigation menu, click Settings
 > Payments.
 - In the Manual payments section, click Add a manual payment.
- In the Name field, enter a manual payment type, such as prepay by bank deposit, lease payment, PayPal, Apple Pay, Afterpay, or ZipMoney.
- Enter instructions about how to make the payment, such as your bank account details and, also, invoice and confirmation details.
- Click Save.
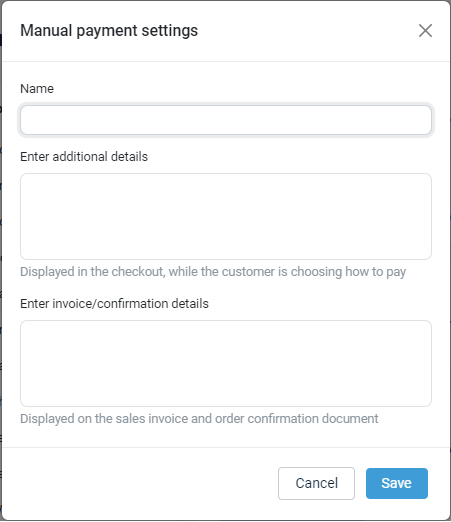
You can repeat these steps to configure additional prepayment methods.
NOTE Prepaid sales orders require your approval. Refer to Approving sales orders.


