Quoting from the Admin Center
NAVIGATION Left navigation menu > Quotes ![]() > Add quote
> Add quote
SECURITY Kaseya Quote Manager internal users assigned to the Purchasing role have view-only access to quotes and sales orders. To manage user roles and permissions, refer to Team.
Kaseya Quote Manager offers a full-featured quoting system that enables you to generate proposals on an ad-hoc basis or from editable pre-built templates. Quoting from the Admin Center is designed for solutions.
This article describes how to create, edit, and follow up on customized quotes you send to your organizations.
To learn how to initiate a quote from in-stock items added to a cart in the Online Store, refer to Quoting from the Online Store.
Building quote templates
BEFORE YOU BEGIN We recommend working with a standard template for use across your organization.
Refer to Building a standard quote template to learn how to do the following:
- Edit the provided quote templates and establish a default choice.
- Personalize quotes using variable fields.
- Add and remove content blocks.
- Customize text blocks and splash blocks using text, images, videos, and tables.
How to...
- From the left navigation menu, click Quotes and then click Add quote on the Quotes page that opens.
- Select a quote template to work in.
- In the new quote that opens, fill out the initial information shown in the following image and defined in the following table:
- In the upper-right corner of the page, click Save. The new quote now appears in the listing on your Quotes landing page.
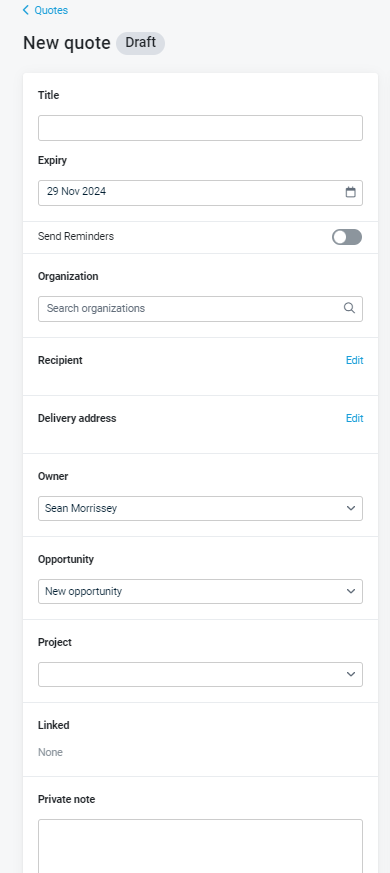
| Field | Description |
|---|---|
| Title |
Enter a short description that helps your organization identify the context of the quote. If you leave this field blank, the title will populate as "Quote {Quote #}" upon saving. |
| Expiry |
Schedule the calendar date on which the quote will expire. By default, Kaseya Quote Manager sets the date 14 days in the future. |
|
Send reminders |
Automated quote reminders will now be sent for this quote according to the reminder rules (quote expires soon and quote not viewed rules) defined for your organization. If the Send Reminders toggle switch is disabled for this quote, then reminders will not be sent regardless of the reminder rules defined. Refer to Automated quote reminders. |
| Organization |
Search for and select the organization for whom you are generating the quote. Once you select an organization, pricing in the quote is automatically adjusted based on the organization's price group setting. To learn how to add an organization to Kaseya Quote Manager and change their price group, refer to Creating and managing organization accounts. |
| Recipient |
Click Edit > Select a contact to select the contact details of the person who should receive the quote. You can create these selectable contacts on the organization detail page. Refer to Creating and managing organization accounts. If no contacts exist for this organization within Kaseya Quote Manager or you would like to add different contact information specifically for this quote, manually enter the Name and Email address of the desired quote recipient. |
| Delivery address |
The delivery address where your organization will receive the goods is populated based on the organization you select. You can edit the organization's default delivery address on the organization detail page. Refer to Creating and managing organization accounts. Click Edit to change the address if necessary. IMPORTANT A valid delivery address is necessary for accurate freight and tax calculation and to send the quote. |
| Owner |
The default owner of the quote is the Kaseya Quote Manager user who created it. You can assign the quote to a different Kaseya Quote Manager user if necessary. |
| Opportunity |
You can assign the quote to an existing opportunity in Autotask or ConnectWise PSA. If you do not select an opportunity, Kaseya Quote Manager will create a new one. |
| Project |
You can assign the quote to an existing Proposal project in Autotask. Refer to Project types in the Autotask PSA Online Help. |
| Linked |
Once a sales order is connected to this quote, it will appear here. |
| Private note |
You can enter internal-only notes in this field. Notes will not appear in the quote and are not visible to your organization. |
Proceed to the subsequent sections of this article to learn how to customize quote content and send a quote.
If you have already created a quote you want to duplicate for another use, complete the following steps to copy it:
- From the left navigation menu, click Quotes
 .
. - Search for the quote you want to copy and click its Quote # to open it.
- Click the More icon
 beside the Save button and select Copy.
 - In the copied quote draft that automatically opens, you have the option to preserve or change any details.
- Click Save to create the copy.

Complete the following steps to view and revert to any previously saved versions of a quote:
- From the left navigation menu, click Quotes
 .
. - Search for the quote you want to revert to a previous version and click its Quote # to open it.
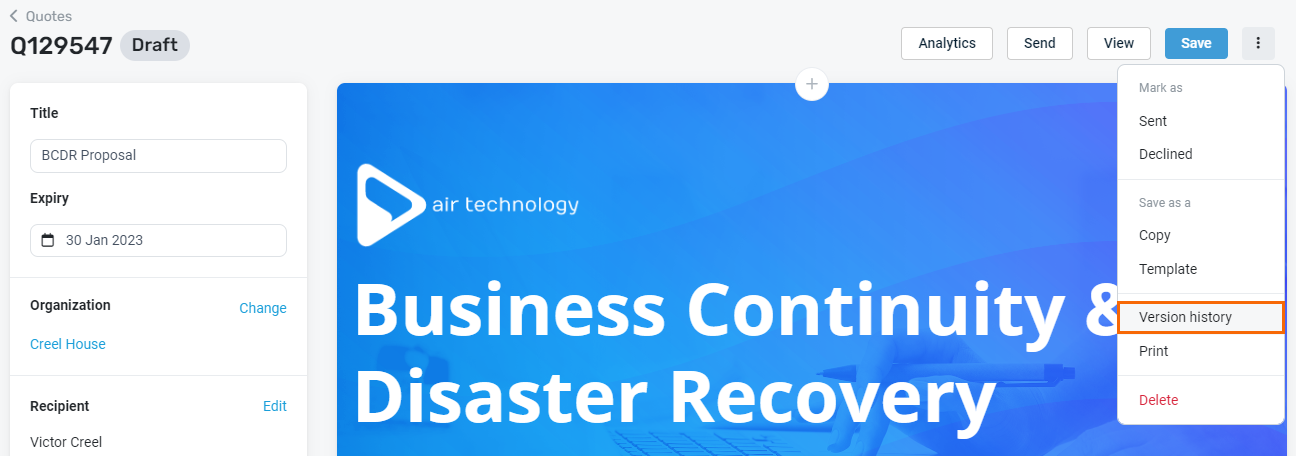
- Click the More icon
 beside the Save button and select Version history.
 - The quote history page will load. Previous versions of the quote appear in the Version history pane on the left side of the page.
- Click any entry to view that version of the quote.
- Click Restore this version to revert the quote to the selected version.
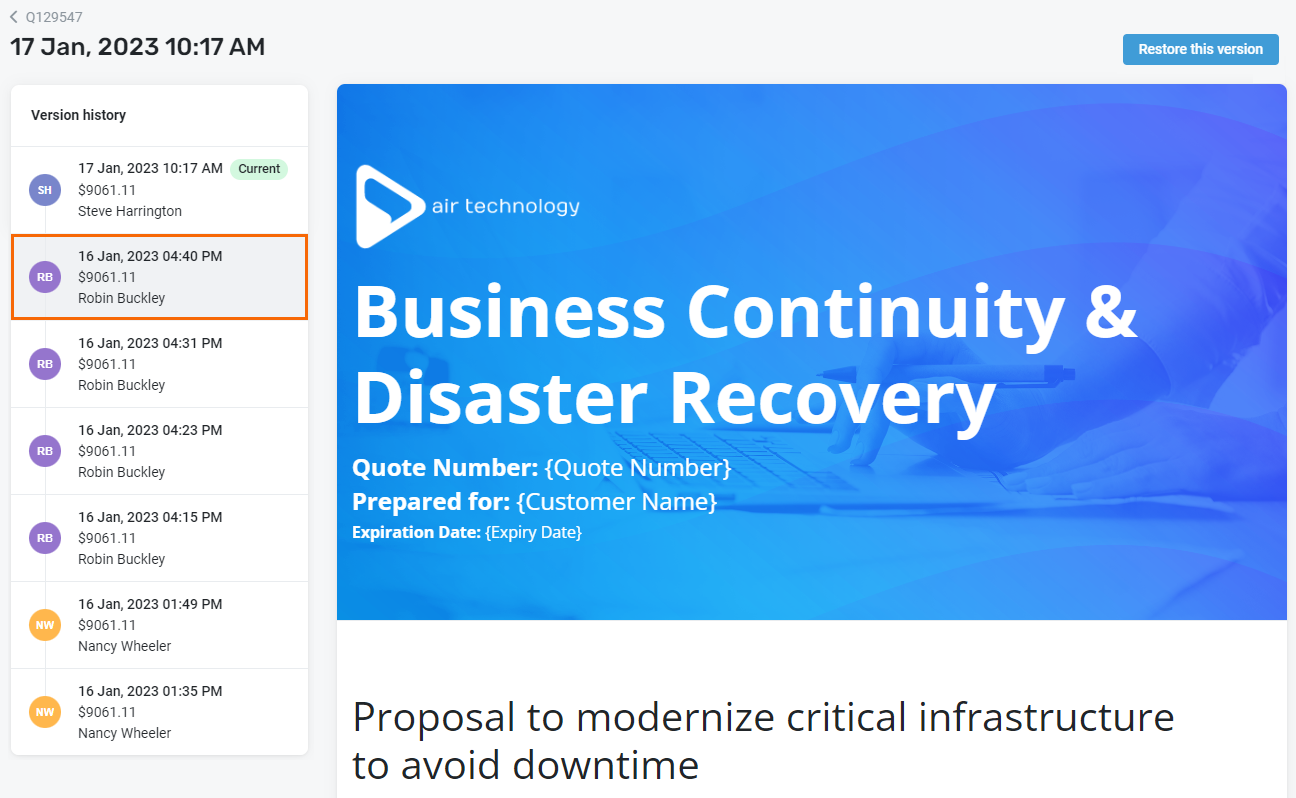
NOTE All previous versions of the quote (including the most recent one) will remain accessible in the Version history index.
- From the left navigation menu, click Quotes
 .
. - Search for the quote you want to delete and click its Quote # to open it.
- Click the More icon
 beside the Save button and select Delete.

IMPORTANT Deleting a quote will completely remove it from your Kaseya Quote Manager instance. Deleted quotes cannot be restored!
You may wish to use a quote you have already created as a template for future quotes. Complete the following steps to add an existing quote to your inventory of quote template options:
- From the left navigation menu, click Quotes
 .
. - Search for the quote you want to turn into a template and click its Quote # to open it.
- Click the More icon
 beside the Save button and select Template.
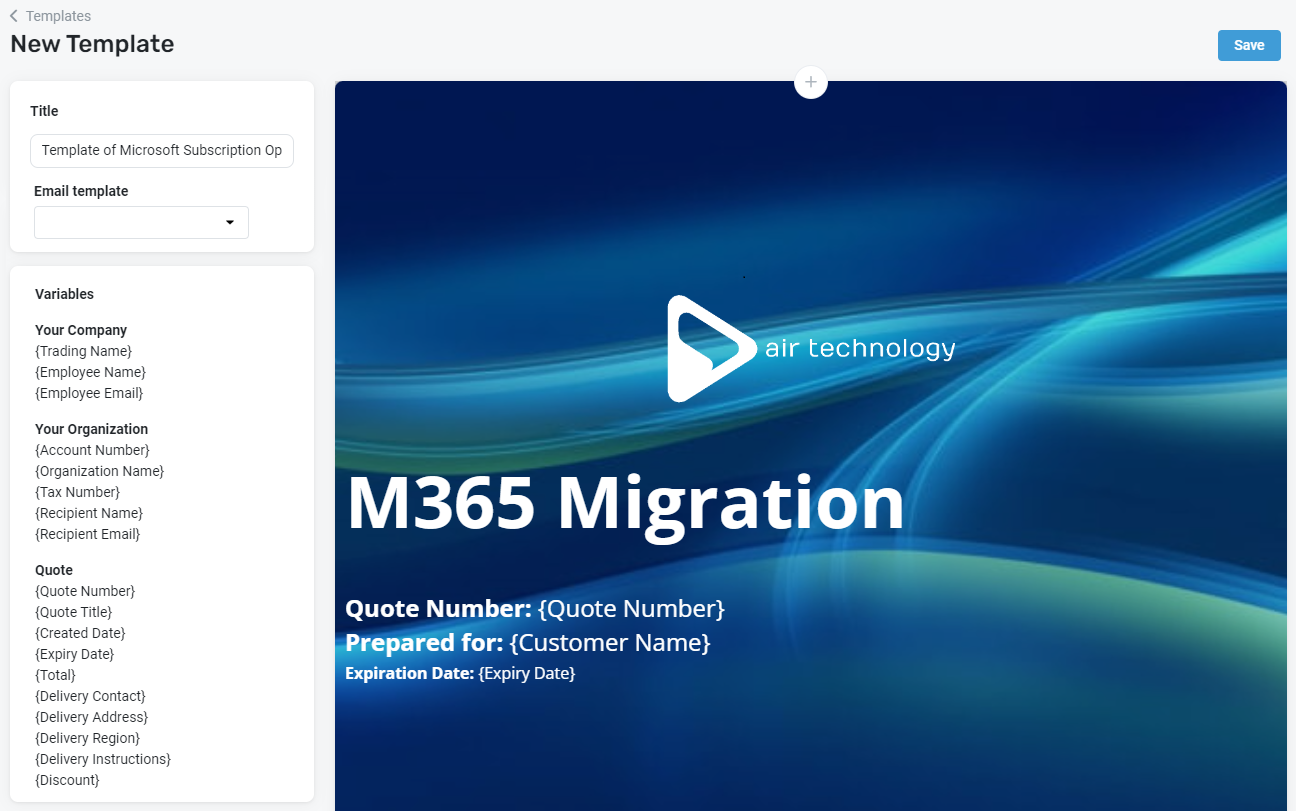
 - In the quote template that opens, you have the option to preserve or change any details, such as the template Title.
- Click Save to add the new template to your quote template gallery for future use. You can access the gallery by clicking Quotes
 > Templates from the left navigation menu.

To learn more about managing your quote templates, refer to Building a standard quote template.
Product blocks
- Click the plus + icon wherever you would like to place the product block in the quote.
- Select the Products option.
- In the Type a block title text box, enter a name for the product block (optional).
- In the Search products box, enter any aspect of a product title, Manufacturer Part Number (MPN), Kaseya Quote Manager Part Number, or Supplier Part Number (product code). In the search window, filters products by category in the upper-left corner or by availability in the upper-right corner. Hover over the availability badge to view a breakdown of stock by supplier or warehouse.
- Select the check box(es) for the product(s) you wish to offer your organization and click Add.
- To review information about the product, click the MPN to view the product's detail page.
- Repeat steps 4 and 5 to add any amount of products to the block.
- Click Save.

You can rearrange the order of products you add to the block. Click and drag the Sorter icon ![]() to the left of any line item you want to move.
to the left of any line item you want to move.
Separate groups of products or varying options by adding more than one product block to a quote.
IMPORTANT Remember to Save your changes often.
- Click the default product description text.
- In the text box, delete any part of the description you want to remove or replace.
- Type new product description text.

NOTE The edited version of a product description in a quote does not carry over to the supplier purchase order (only the original product description is displayed, which can also be edited on the purchase order). Therefore, do not hesitate to use organization-facing wording. Suppliers primarily rely on the Supplier Part Number to identify a product on a purchase order.
The following table shows all product pricing columns. The values are editable, unless otherwise specified.
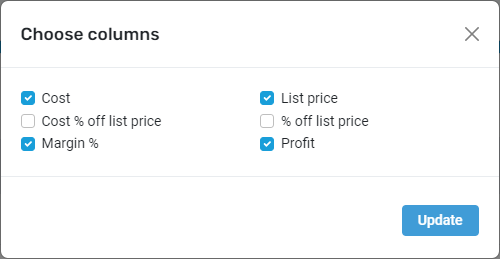
Fields marked with an asterisk (*) can be shown or hidden in the quote editor as follows:
- Click the Gear icon
 beside the product column headings.
 - Select or clear the check boxes for the columns* you do or do not need to see in the quote editor, respectively.
- Click Update.
NOTE Only the Qty, Price, GST/VAT/Tax (field not applicable to the United States or Canada), and Subtotal are displayed to your organization in the finished quote.
| Column name | Definition |
|---|---|
|
The product quantity you offer your organization. NOTE You may choose to allow the organization to change this value when viewing the quote. Refer to Allow an organization to adjust the product quantity in a quote. NOTE If the product stock becomes insufficient to fulfill the selected quantity, you will receive an in-product notification. Refer to Viewing in-product notifications. |
|
|
Price |
The price your organization will pay for this product upon quote acceptance. This value multiplied by the product quantity creates the Subtotal. |
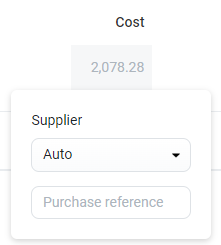
| Cost* |
For Physical and Non physical SKUs: From the drop-down menu, select from the following options:
Optionally, enter the Purchase reference value.
NOTE Because cost prices fluctuate, this value is not stored in the quote but rather calculated in real time. The linked sales order will contain the up-to-date cost as it is applied to the transaction. Overriding the Cost and Supplier fields on the quote line locks in the cost price, which is carried over to the purchase order after quote acceptance. If needed, manually override the cost derived from the product detail page by entering a new value. Refer to Type in Adding and managing products and services. |
| List Price* |
Recommended retail price (RRP) provided by the manufacturer. NOTE This value is not editable. |
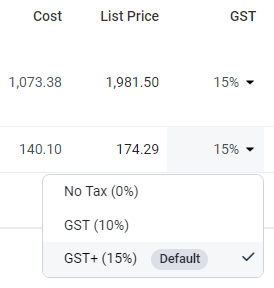
|
Sales tax rate (calculated based on the delivery address selected in the quote). For GST (goods and services tax) and VAT (value-added tax) systems, you have the option to customize the tax rate for any product in the block. Select a rate from the drop-down menu. To learn how to configure multiple sales tax rates for a country, refer to Setting tax rates.
If the delivery address is set to a country other than Australia, New Zealand, the United Kingdom, Europe, the United States, or Canada, you will see the Tax field. Select an option from the drop-down menu to customize the tax rate for any product in the block. If your tax settings are not configured to collect sales tax from the country set as the quote's delivery address, the sales tax for each product will be 0%. NOTE For the United States and Canada, sales tax will be automatically calculated and displayed in the quote summary. Refer to Set sales tax rates for the United States and Set sales tax rates for Canada. |
| Cost % off list price* |
Helps determine if purchase price can be improved. NOTE This value is not editable. |
| % off list price* |
The amount (%) off the recommended retail price. Editing this value changes the Price (and therefore the Subtotal), Margin %, and Profit. NOTE The % off list price is different from the quote discount (% or $) - refer to Apply a discount to a quote. |
| Margin %* |
Your percent profit. Editing this value changes the Price (and therefore the Subtotal), % off list price, and Profit. NOTE If the Margin % happens to decrease after the quote is initially saved, you will receive an in-product notification. Refer to Viewing in-product notifications. |
| Profit* |
Price - Cost = Profit. |
|
The Price multiplied by the product quantity creates the Subtotal. The final total your organization pays is the subtotal plus tax and shipping. NOTE This value is not editable. |
To hide all product information from your organization and show only the name of the product block and their subtotal, complete the following steps:
- Click the More icon
 beside the product block header.
 - Turn off the Show products toggle.

To hide product pricing details from your organization (and show only their subtotal), complete the following steps:
- Click the More icon
 beside the product block header.
 - Turn off the Show prices toggle.

To allow your organization to choose from multiple options, you must complete the following steps for two or more product blocks that appear consecutively.
Once you do so, your organization will be able to select exactly one of the product block options that you made available for them to choose from.
- Click the More icon
 beside the product block header.
 - Turn on the Multi choice toggle.
- Click Save.
Your organization must click the circle in the upper-left corner of the product block they choose.
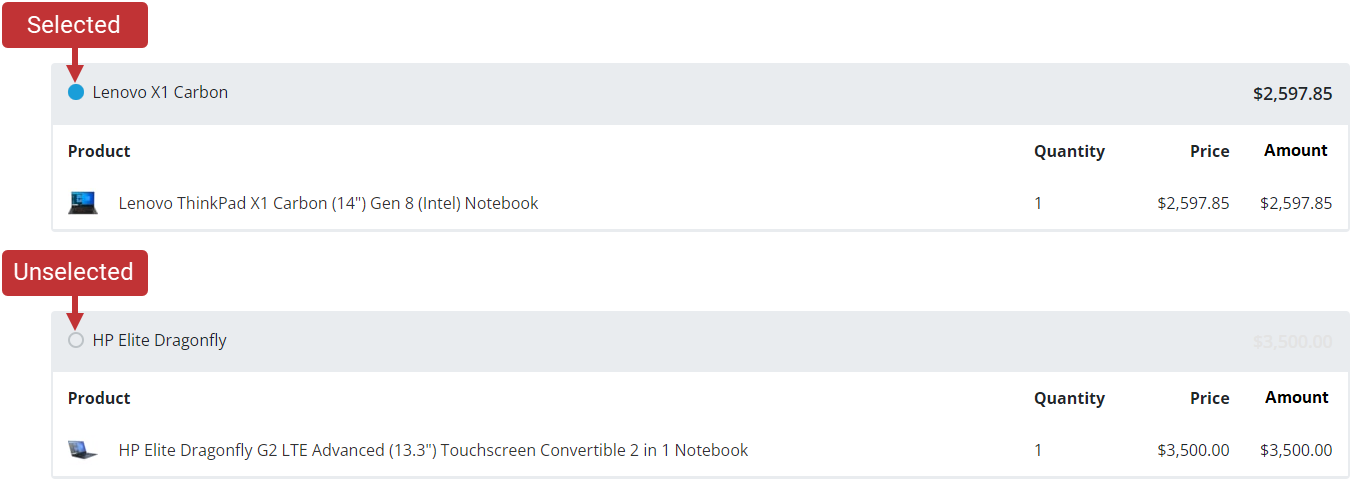
NOTE The product block selected in the quote editor before you saved and sent the finished quote will appear as the default selection in the quote that your organization sees. The organization can choose to change the selection when they are viewing the quote.
NOTE You can create multiple sets of multi-choice options within a quote. To do so, simply add at least one non-multi-choice section in between sets.
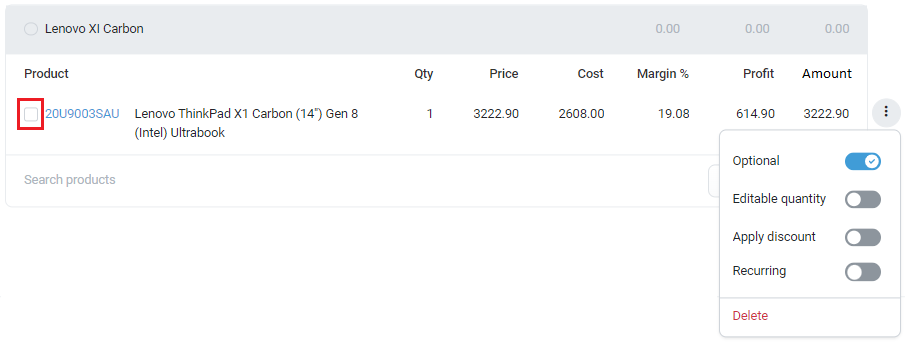
You can add a check box next to a product you would like to make optional in a quote.
Your organization can choose whether or not to select the check box to purchase the item. Pricing automatically updates to reflect their choice.
Complete the following steps to make a product optional:
- Click the More icon
 beside the product details.
 - Turn on the Optional toggle.
- If you would like the product selected by default when your organization views the quote, select the check box that appears beside the Manufacturer Part Number yourself. Otherwise, leave it unchecked.
- Click Save.
By default, an organization cannot edit the offerings you share with them in a quote. However, you can enable your organization to edit the quantity they purchase of a specific product as follows:
- Click the More icon
 beside the product details.
 - Turn on the Editable quantity toggle.
- If necessary, repeat these steps for any additional products you want to make editable.
- Click Save.
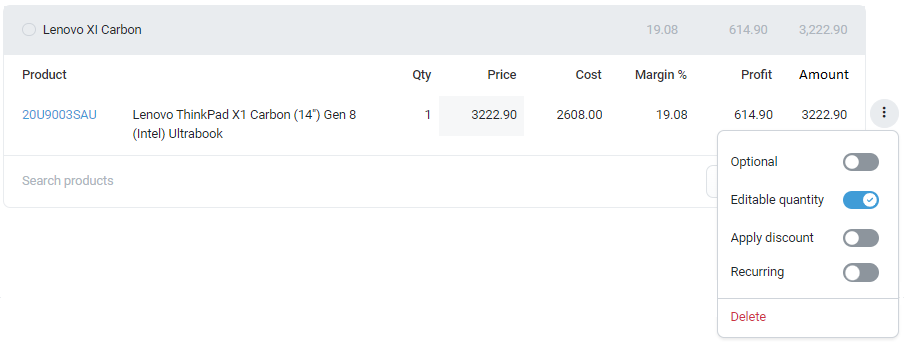
Now, your organization can edit the Quantity text box within the quote. Pricing automatically updates to reflect the quantity they enter.

IMPORTANT Avoid enabling an editable quantity for an optional item. This can confuse your organization. If a quantity is editable, the organization can simply set the quantity to 0 if they do not want to purchase the item.
You have the option to quote and sell certain products on a recurring basis. Complete the following steps to configure recurring revenue products within a quote:
- Click the More icon
 beside the product details.
 - Select a recurrence interval from the drop-down menu: Monthly, Quarterly, or Yearly.
- Enter the number of cycles for recurrence.
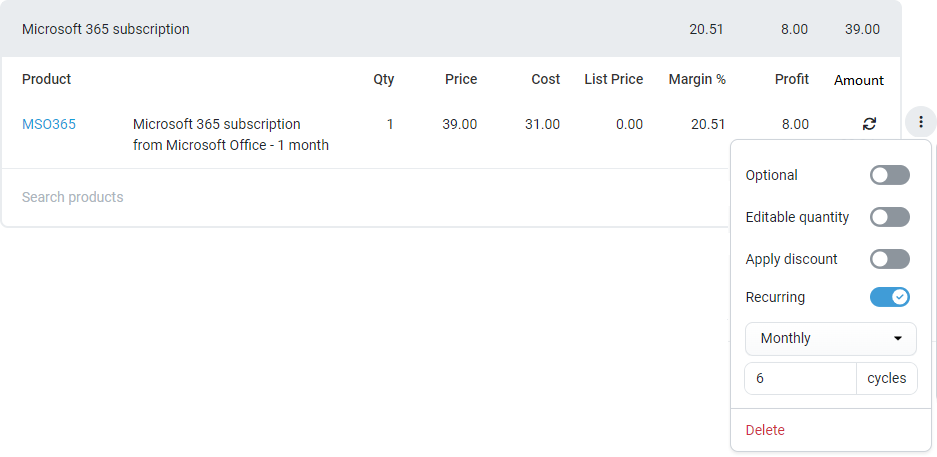
Organizations will see the recurrence interval and number of cycles displayed in their quote.

The accept block also shows recurrence details. Refer to Review the quote summary.
NOTE Bill recurring invoicing in Autotask, ConnectWise PSA, or your accounting system.
From time to time, you may need to add an item to a quote that does not exist as a product in your platform. Complete the following steps to do so:
- In a product block, click Add custom product.
- Enter and select the custom product details and click Add line item.
- Click Save to officially add the custom product to the quote.

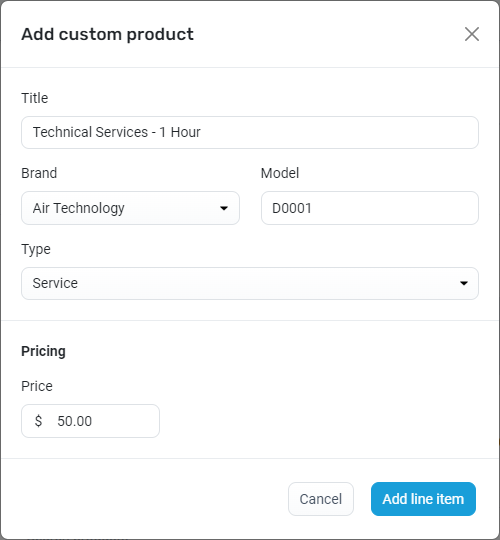
NOTE Upon quote expiry, any custom products featured in a quote become obsolete. To convert a custom product into a permanent product in your platform, click the product's Manufacturer Part Number within the product block. Edit the product detail page as necessary. If the supplier chosen has a product feed, lock supply so the product will not be made obsolete. Refer to Lock supplier product data.
Kaseya Quote Manager features the option to apply a discount (% or $) to a quote. The discount applied determines the net price of a product in a quote; product tax is determined by product net price. The discount is noted on a number of reports (Quote summary, Quote detail, Sales summary, Sales detail, and Sales by coupon) and also the Sales order email. Some points to note about applying discounts to quotes are:
-
Discounts apply to the total quantity of the line. For example, a $100 discount for a Qty of 2 will apply a $50 discount to each unit.
-
A discount cannot be applied if it results in a negative sell price.
-
A discount does not directly affect the shipping price. But if shipping is a price-based calculation, then the discount can indirectly affect shipping price.
Before applying a discount to a quote, note the following about discount behavior:
-
If you apply a discount and then manually alter the price of the quote line, the discount will be calculated off the new price and the discount will remain the same.
-
If you apply a discount and then manually alter the margin of the quote line, the price will be updated to satisfy the margin and the discount will remain the same.
-
If you apply a discount and then manually alter the profit of the quote line, the price will be updated to satisfy the margin and the discount will be removed.
NOTE The quote discount (% or $) is different from the % off list price, which is the amount (%) off the recommended retail price.
Steps
Complete the steps in the following procedure to apply a discount to a quote.
- Click the More icon
 beside the first line in the quote.
 - Turn on the Apply discount toggle.
- Select % from the dropdown menu and enter a value of 10 to apply a 10% discount to the unit price.
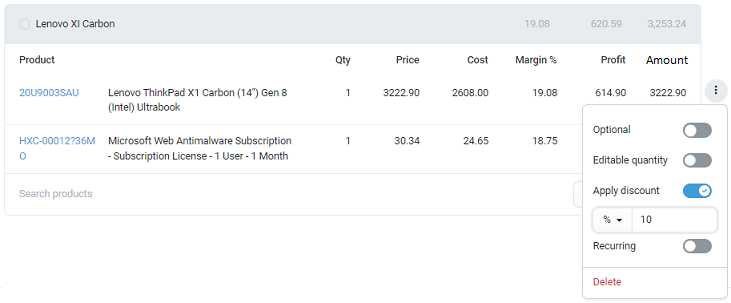
- Click the More icon
 beside the second line in the quote.
 - Select $ from the dropdown menu and enter a value of 5.00 to apply a $5 discount to the unit price.
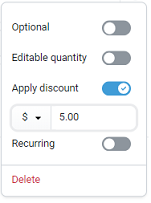
Organizations will see the discounts applied in step 3 and step 5 displayed in their quote.

Consider the example quote shown in the following image where a different discount is applied to each line in a quote.
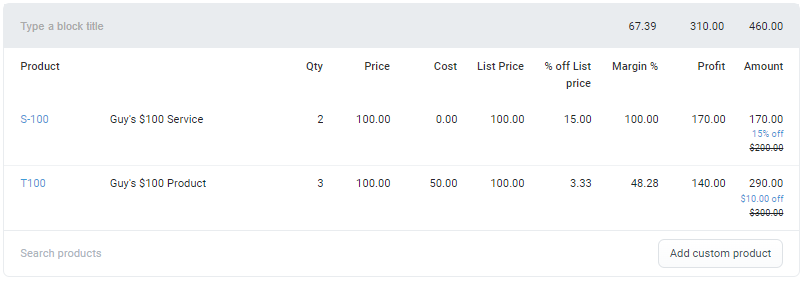
In this example:
-
A 15% discount is applied in the first line of the quote, so the net line total is $170.
-
A $10.00 discount is applied in the second line of the quote, so the net line total is $290.
-
But if you apply a $-based discount to the quote overall, the discount amount would be apportioned as follows:
-
36.956% of the quote discount will apply to line 1 (because 170/460=0.36956).
-
63.043% of the quote discount will apply to line 2 (because 290/460=0.63043).
-
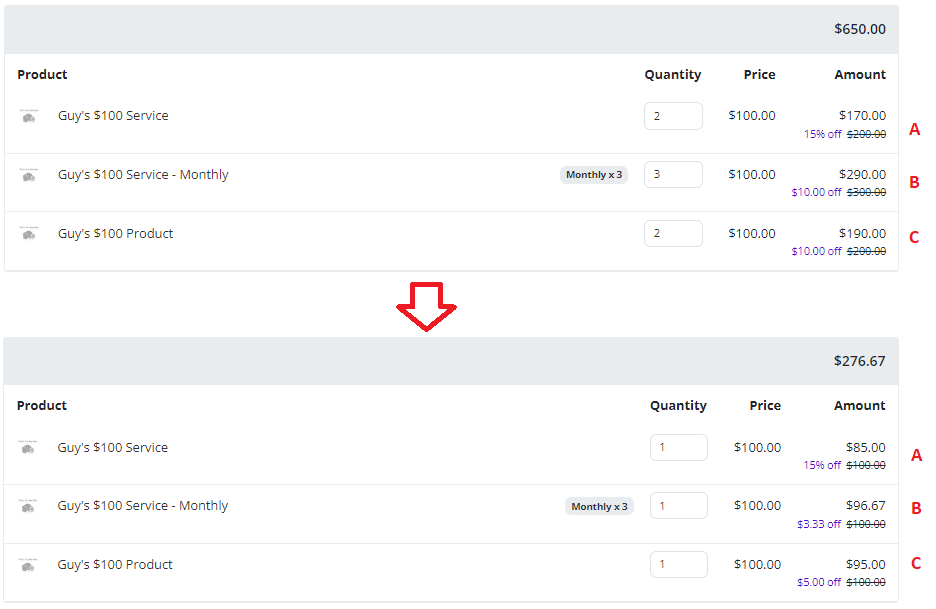
Provided Editable quantity is enabled for the line in a quote, organizations can modify the unit quantity within the quote after they save it (but before they accept it), which will impact the discount amount applied to the quote. Consider the discounts applied in the following image.
-
If the organization changes the quantity from 2 to 1 in the first line, then instead of 15% off 2 units at $100 each, there will be 15% off 1 unit at $100.
-
If the organization changes the quantity from 3 to 1 for the recurring service in the second line, then instead of $10 off 3 service units at $100 each, there will be $3.33 off 1 unit at $100.
-
If the organization changes the quantity from 2 to 1 in the third line, then instead of $10 off 2 units at $100, there will be $5 off 1 unit at $100.
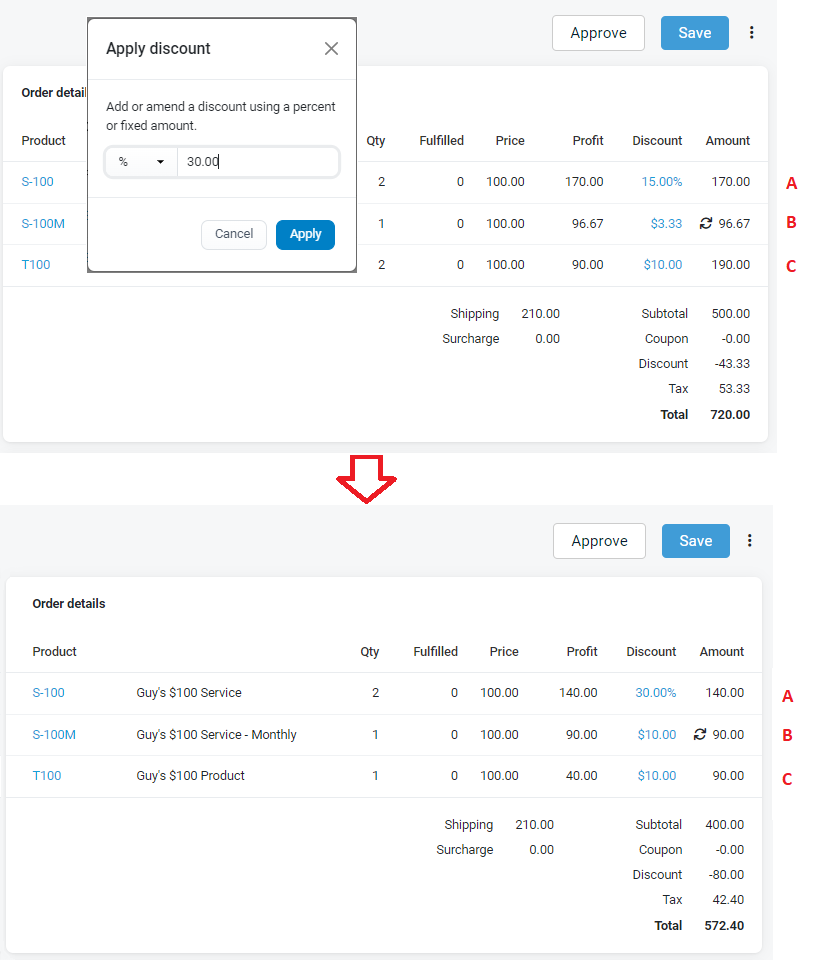
MSPs have the power to modify the unit quantity and also the discount(s) applied in a sales order before approving it, which will override any discounts already applied by the organization via the online store.
To modify the quote discount and quantity in a sales order
-
Open the sales order that you want to modify.
-
Click the discount value you want to change, modify the value in the Apply discount dialog that opens and then click Apply to apply the new discount rate.
-
Modify the value in the Qty field as required. For example, in the following image the MSP has:
-
Increased the discount from 15% to 30% in the first line for the same unit quantity.
-
Increased the discount from $3.33 to $10 in the second line for the same unit quantity.
-
Reduced the quantity in the Qty field from 3 to 1 in the third line so that the same $10 discount applies to 1 unit now.
-
Proposal project labor blocks
NOTE A proposal project must be linked to a quote in order to add available labor items.
-
Click the plus + icon wherever you would like to place the labor block in the quote.
-
Select the Labor option.

- In the Type a block title text box, enter a name for the labor block (optional).
- Click Add Proposal Project Labor.
- In the Search box, enter the name of a task associated with the proposal project. Results can be filtered by Phase or Role.
- Select the check box(es) for the task(s) and its associated role rate(s)you wish to add to your quote and click Add.
- Repeat steps 4-6 to add any other number of project tasks to the block.
- Click Save.
You can rearrange the order of labor rates you add to the block. Click and drag the Sorter icon ![]() to the left of any line item you want to move.
to the left of any line item you want to move.
Separate groups of labor rates or varying options by adding more than one labor block to a quote.
To hide all labor information from your organization and show only the name of the labor block and their subtotal, complete the following steps:
- Click the More icon
 beside the labor block header.
 - Turn off the Show products toggle.

To hide product pricing details from your organization (and show only their subtotal), complete the following steps:
- Click the More icon
 beside the labor block header.
 - Turn off the Show prices toggle.

To allow your organization to choose from multiple options, you must complete the following steps for two or more labor blocks that appear consecutively.
Once you do so, your organization will be able to select exactly one of the labor block options that you made available for them to choose from.
- Click the More icon
 beside the labor block header.
 - Turn on the Multi choice toggle.
- Click Save.
Your organization must click the circle in the upper-left corner of the labor block they choose.

NOTE The labor block selected in the quote editor before you saved and sent the finished quote will appear as the default selection in the quote that your organization sees. The organization can choose to change the selection when they are viewing the quote.
NOTE You can create multiple sets of multi-choice options within a quote. To do so, simply add at least one non-multi-choice section in between sets.
You can add a check box next to a labor item you would like to make optional in a quote.
Your organization can choose whether or not to select the check box to purchase the item. Pricing automatically updates to reflect their choice.
Complete the following steps to make a product optional:
- Click the More icon
 beside the labor details.
 - Turn on the IsOptional toggle.

- If you would like the labor task selected by default when your organization views the quote, select the check box that appears beside the Task name yourself. Otherwise, leave it unchecked.
- Click Save.
Refer to Apply a discount to a quote for more information.
Quote importing
Import the following types of supplier quotes directly from Excel into Kaseya Quote Manager:
- bid pricing for a customer
- a configured bill of materials (BOM) from a vendor
- a special quote from a supplier
- your own products or services
The following conditions apply to an imported supplier quote:
- Can be applied to a specific quote.
- Bid pricing applies only to the quote in which the import was configured. This pricing will not appear in any other quotes or the Online Store.
- The bid pricing is contingent upon the purchase of all items in the bid.
- Based on imported Manufacturer Part Numbers (MPNs), any SKUs that do not already exist in Kaseya Quote Manager are automatically created. This feature eliminates the need for ad-hoc SKUs that are difficult to manage in your Online Store and during the procurement process.
Steps
- From the left navigation menu, click Quotes
 .
. - Click New quote. Or, search for a pre-existing quote and click the Quote # to open it.
- Click the plus + icon wherever you would like to place the imported items.
- Select the Import option.
- Copy relevant cells from your supplier quote spreadsheet.
- Paste the copied data in Kaseya Quote Manager.
- Click Next.
- Select from the header drop-down menus to map columns as required.
- Click Next.
- Enter the Bid number.
- Select a supplier from the Select a supplier drop-down menu and a brand from the Select a default brand drop-down menu. Refer to Adding suppliers and product feeds and Managing brands to learn how to configure suppliers and brands in Kaseya Quote Manager.
- We recommend turning on the toggle for Import headings as a new block to import SKUs in the same sections as the quote rather than one block of all SKUs.
- A quoted sell price overrides a bid sell price and the supplier cost price. If you turn on the toggle for Use auto supplier selection, supplier cost price is set by the bid cost price or by the least expensive supplier.
- Sell pricing can be calculated on import. Choose one of the following options from the Price calculation drop-down menu:
- Auto: Apply normal mark-up rules.
- Margin %: Calculate the sell price as a percentage mark-up from cost.
- List Price discount %: Calculate the sell price as a percentage discount from list price, also known as recommended retail price (RRP).
- Click Import. A new product block will feature the imported items.
- Click Save to save the quote with the new product block.

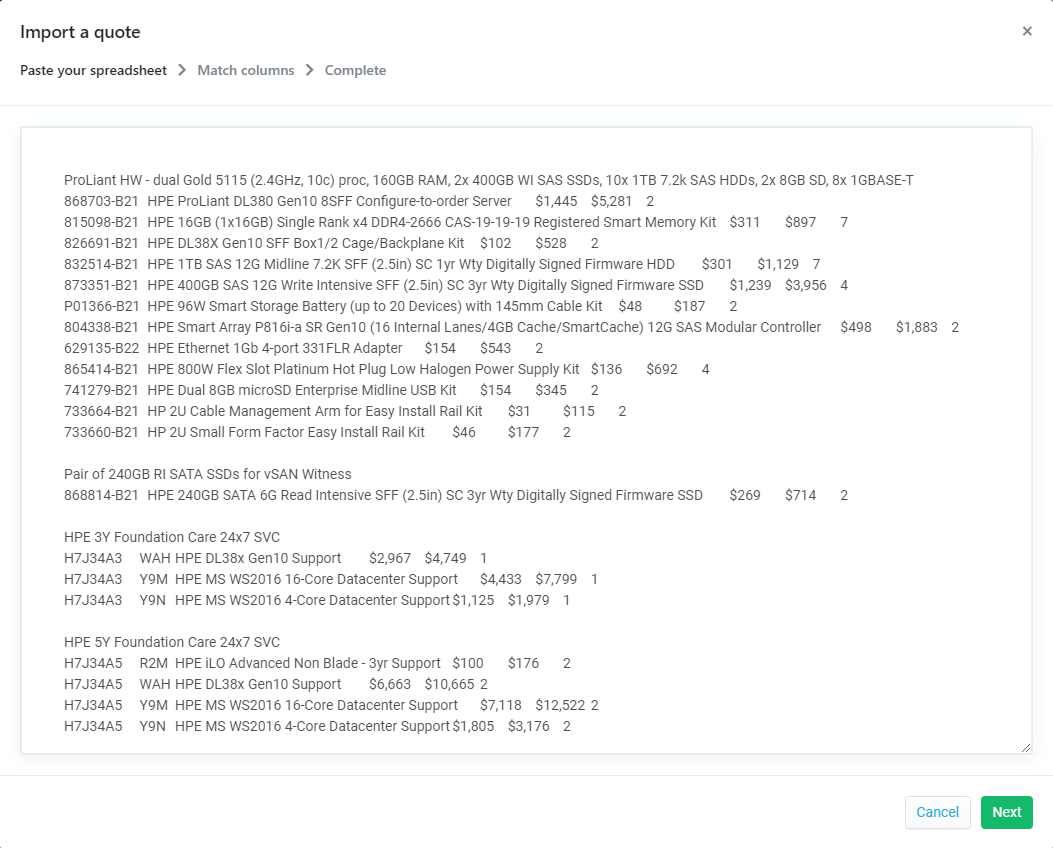
The importer detects the number of columns present and calculates the data types in each column (integer, decimal, date, string, and so forth) to create a fingerprint that can be used to determine if a future import is the same format.

The next screen will share the number of products being imported and how many new products will be created.
Opportunity sync
BEFORE YOU BEGIN In order to sync a quote to an existing opportunity in Autotask or ConnectWise PSA, you must first activate opportunities sync as part of the integration setup process. For instructions, refer to Opportunity synchronization (Autotask) or ConnectWise PSA opportunities sync.
In a new or existing quote, complete the following steps to sync an opportunity from Autotask or ConnectWise PSA. If you do not sync an opportunity, Kaseya Quote Manager will create a new one.
- From the Opportunity drop-down menu, select the opportunity to sync.
- Click Save.
- The selected opportunity will show one of three statuses:
- Synced
 : The quote has successfully synced to a new or existing opportunity.
 - Syncing
 : The quote is in the process of syncing to an existing opportunity or creating a new one.
 - Sync error
 : The last saved version of the quote did not sync to an existing opportunity.
- Synced
Once synced, click View to open the opportunity directly in Autotask or ConnectWise PSA.
Quote completion and acceptance
The accept block features a breakdown of charges and a button for your customer to accept the quote or for a Kaseya Quote Manager user to accept the quote on the customer's behalf.
Scroll to the accept block in a quote.
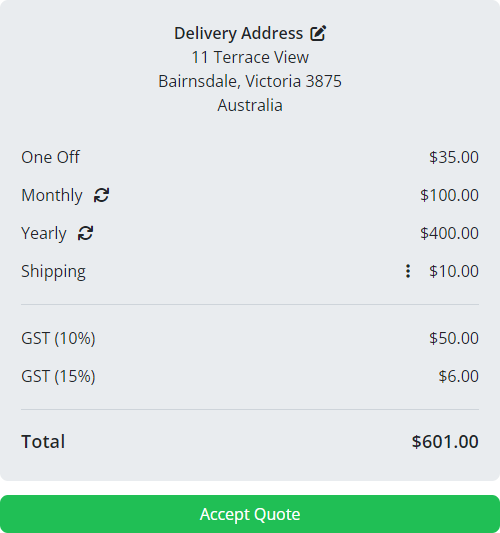
IMPORTANT The taxes shown in the quote summary are only an estimate. The actual tax calculation is completed when the quote is viewed using the View button. Refer to Preview a quote
In the preceding example, the following conditions apply:
- The delivery address set in the quote is in Australia. Refer to Delivery address.
- The One Off charge is the subtotal of two non-recurring products: one $30 and one $5.
- The Monthly charge is the initial subtotal of one service that will be charged on a monthly basis for six months.*
- The Yearly charge is the initial subtotal of one service that will be charged on a yearly basis for two years.*
- The Shipping charge is automatically calculated. Refer to Setting shipping rates. This charge is also editable. Refer to Control the shipping fee in a quote.
- The GST (10%) (goods and services tax) charge applies to the two recurring services in the quote (10% of $100 + $400). Refer to Tax to learn how to set a specific tax rate for any one product in a quote based on the quote delivery address.
- The GST (15%) charge applies to the $30 one-off product and the shipping charge (15% of $30 + $10). The reason this tax rate applied to the shipping charge is because the 15% GST was set as the default sales tax rate for Australia in the Admin Center. Refer to Setting tax rates.
- The $5 one-off product was set to a 0% GST in the quote. Therefore, no tax charge is reflected for this product.
- The Total charge is the sum of the two one-off products, the two initial recurring services, shipping, and tax.
*When viewing the quote, organizations and Kaseya Quote Manager internal users will be able to see the number of recurrence cycles for any recurring products. Refer to Add a recurring revenue product or service to a quote to see an example.
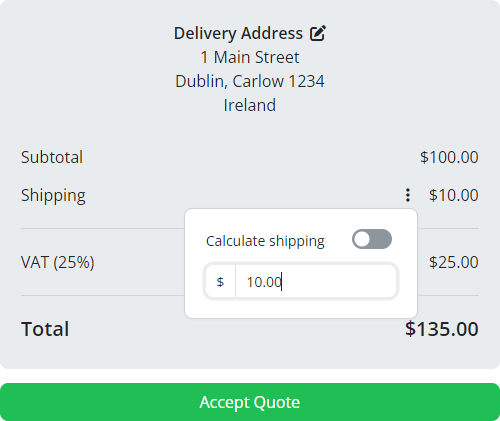
Kaseya Quote Manager automatically calculates a shipping charge based on your product and service offerings in a quote. Refer to Setting shipping rates.
However, you can replace the default charge with any shipping amount of your choice as follows:
- Scroll to the accept block in a quote.
- In the Shipping row, click the More icon
 .
. - Turn off the Calculate shipping toggle.
- In the text box that appears, replace the default shipping charge with any amount. The quote Total will be automatically updated.
- Click Save.
- In the corner of the page, click View.
- A preview of the finalized quote web page will open in your browser. This is what your organization will see once you send the quote. Click a product to view an in-page quick-view of product details.
- Review the quote and close out of the web page to return to the quote editor.

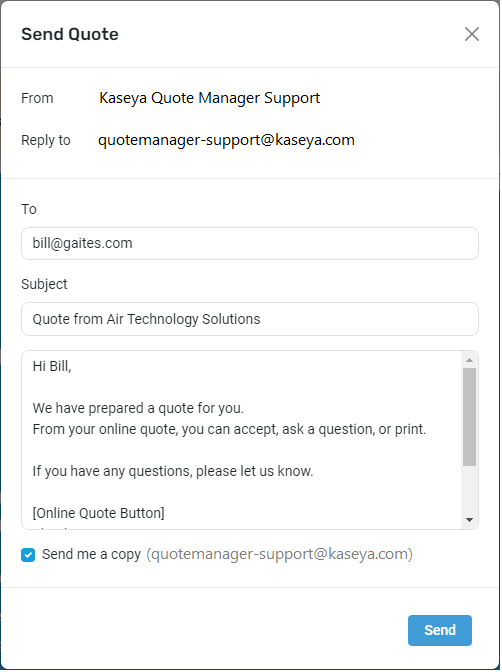
Within Kaseya Quote Manager, you can send an email to any organization that includes a link to the dynamic online quote you created for them. Complete the following steps to do so:
- When you have completed the quote, click Save.
- Click Send.
- Check the From and Reply to values for accuracy.
- Check the To value for accuracy.
- Optionally, edit the email Subject and personalize the message to your organization.
- Optionally, select the Send me a copy check box if you would like to CC yourself on the email.
- Click Send to officially send the quote.

NOTE If you assigned an Owner to the quote, the quote will appear to have been sent from the owner, and the owner will receive any organization replies to their email address. To change the quote owner's contact information, refer to Creating and managing staff accounts.
If you did not assign an Owner to the quote, the quote is associated with your general company contact details. To configure those details, refer to Adding company details.
NOTE If you assigned a Recipient to the quote, their contact email address will appear here, and they will receive the quote to that email address.
You can manually change the To email address at this step, if needed.
NOTE You can add multiple recipients by separating each email address with a semicolon.
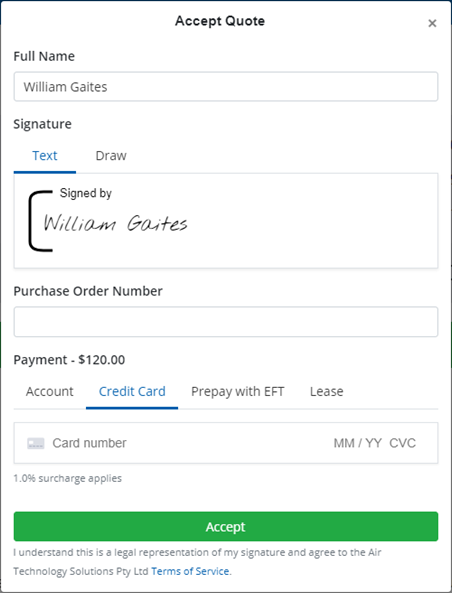
Organizations can digitally sign a quote upon clicking Accept. The quote status will change to Won.
Want to share the quote a different way?
Alternatively, you may choose to send the quote in a different type of message, document, or application outside of Kaseya Quote Manager. Complete the following steps to do so:
- Click View to open and review the finalized quote.
- Copy the quote URL from the web browser address bar.
- Paste the quote URL anywhere you would like to share it.
Refer to Team to learn about Kaseya Quote Manager user roles and permissions required for this action. Complete the following steps to accept a quote on behalf of an organization:
- When you have completed the quote, click Save.
- Click View to open the finalized quote.
- Scroll to the accept block and click Accept.
- If applicable, enter the quote's Purchase order number and select the associated Ticket from the drop-down menu.
- Enter Payment information.
- Read and agree to the Terms of Service. Customers must read and acknowledge the terms of service set by their MSP, otherwise they will not be able to accept the quote.
- Click Accept.

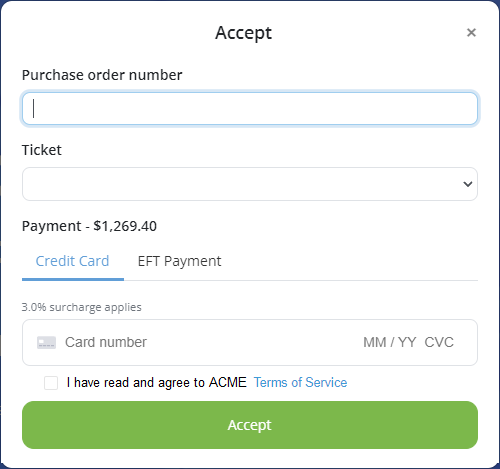
Once the quote is accepted, Kaseya Quote Manager creates a corresponding sales order and automatically orders the goods through the normal Purchasing Optimizer (automated procurement) process.
NOTE Sales orders can be assigned to a ticket in Autotask or ConnectWise PSA.
Configure any number of email addresses to receive a notification when a quote is viewed or accepted. From the left navigation menu, click Settings ![]() > Notifications.
> Notifications.
If you share a quote outside of the built-in quote email feature, you may need to manually change the quote from the Draft state to a Sent or Declined state. In the upper-right corner of the page, click the More icon ![]() and select Sent or Declined. These actions can be easily changed or reverted via the More menu
and select Sent or Declined. These actions can be easily changed or reverted via the More menu ![]() .
.
After marking as Sent, if your organization accepts the quote or you accept the quote on behalf of your organization, the quote status will change to Won. Refer to Accept a quote on behalf of an organization. Accept a quote on behalf of an organization.
Once a quote has been accepted, it cannot be converted to a sales order a second time. If you need to make changes to a quote that is already won, complete the following steps:
- Copy the original quote. Refer to Copy an existing quote.
- Make any necessary changes to the new quote.
- Send the new quote to your organization for acceptance. Refer to Send a quote to an organization. Or, accept the new quote on your organization's behalf. Refer to Accept a quote on behalf of an organization.
- Once the quote is accepted, Kaseya Quote Manager creates a corresponding sales order and automatically orders the goods through the normal Purchasing Optimizer (automated procurement) process.
- You may choose to delete the original accepted quote, which will unlink it from the original sales order. Refer to Delete a quote. In order to prevent purchase order creation, cancel the original sales order. Refer to Amend or cancel a sales order.
NOTE Upon copying a quote, Kaseya Quote Manager will refresh pricing according to current supply. As usual, you have the option to manually adjust sell pricing.
NOTE A cancelled sales order will continue to appear on your Sales dashboard with the Cancelled ![]() status.
status.
A quote Audit Trail is available on the last page of a won (accepted) quote PDF file. Kaseya Quote Manager encrypts the signed PDF file with tamperproof technology to ensure it complies with global e-quoting regulations. Access the PDF file and Audit Trail as follows:
- Click the More icon
 and select Print.
 - Choose to save or open the PDF file.

NOTE Depending on your device settings, the file may download automatically.
Alternatively, organizations or Kaseya Quote Manager internal users can click the Print icon ![]() in a completed quote.
in a completed quote.
![]()
Audit Trail
You can access the following information on the Audit Trail page:
- The quote Title in Kaseya Quote Manager, a unique Document ID, and the Signature of the quote acceptor.
- The date and time that the quote was viewed and the IP address from which the quote was viewed.
- The date and time that the quote was signed and the name and IP address of the acceptor.
- The date and time that the quote was completed and sent.
NOTE If the organization who viewed the quote has previously logged in to your Online Store, you will see their name rather than their IP address.
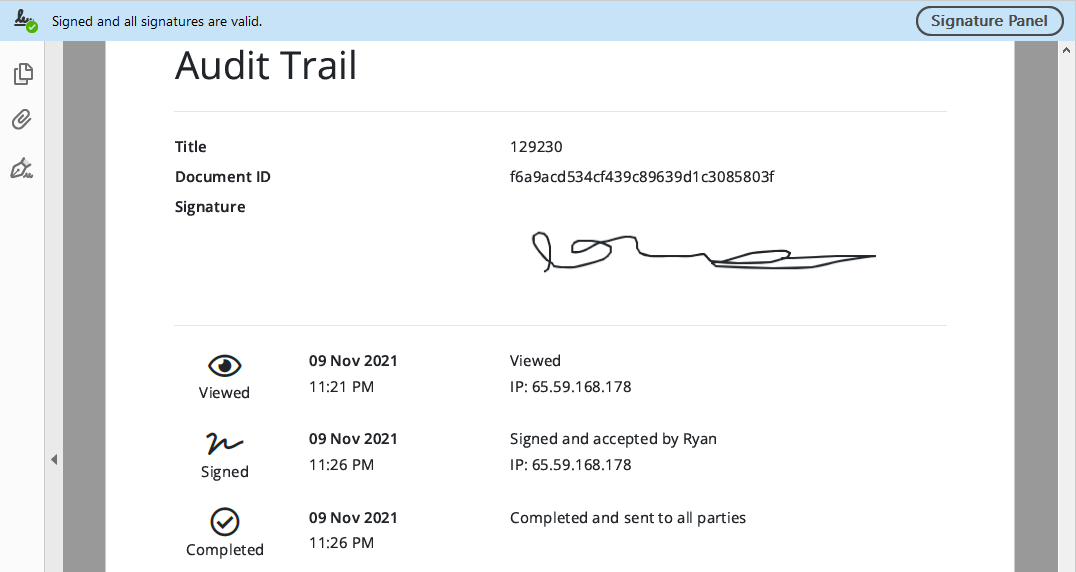
NOTE Times are recorded in the time zone set in your Admin Center. Refer to Time zone in Adding company details.
NOTE The Audit Trail is not available until the quote is won.
Refer to Quote activity notifications to learn how to configure email notifications when organizations view or accept quotes online. Any email address or quote owner is eligible to receive notifications.
Organization comments will be sent to the address configured against the user account that created the quote. Refer to Creating and managing staff accounts.
PDF files of accepted quotes contain history on quote views, acceptance, and completion. Refer to Save or print a signed PDF file of a quote.
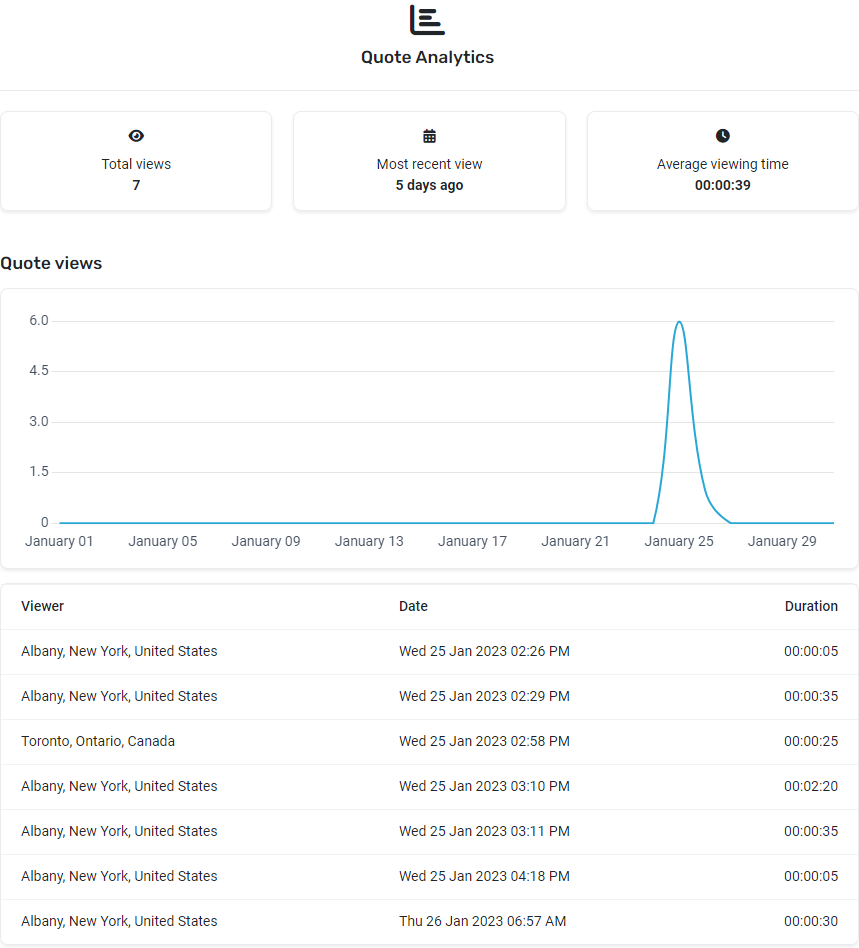
You can also view live quote activity from the quote editor. Refer to View quote analytics.
Click Analytics to easily access data that shows organization activity in a quote.

Review any of the following details:
- The number of times the organization viewed the quote.
- How long ago the organization most recently viewed the quote.
- The average amount of time the organization spent reviewing the quote with each view
- The number of quote views by date.
- A listing of each quote view, including the viewer's name or IP address location, date, time , and duration of the view.
NOTE Views by Kaseya Quote Manager internal users are not counted.
NOTE If the organization has previously logged in to your Online Store, you will see their name rather than their IP address location in the Viewer column.
NOTE Times are recorded in the time zone set in your Admin Center. Refer to Time zone in Adding company details.
To learn how to download detailed quote reports as CSV spreadsheets, refer to Quotes reporting.
